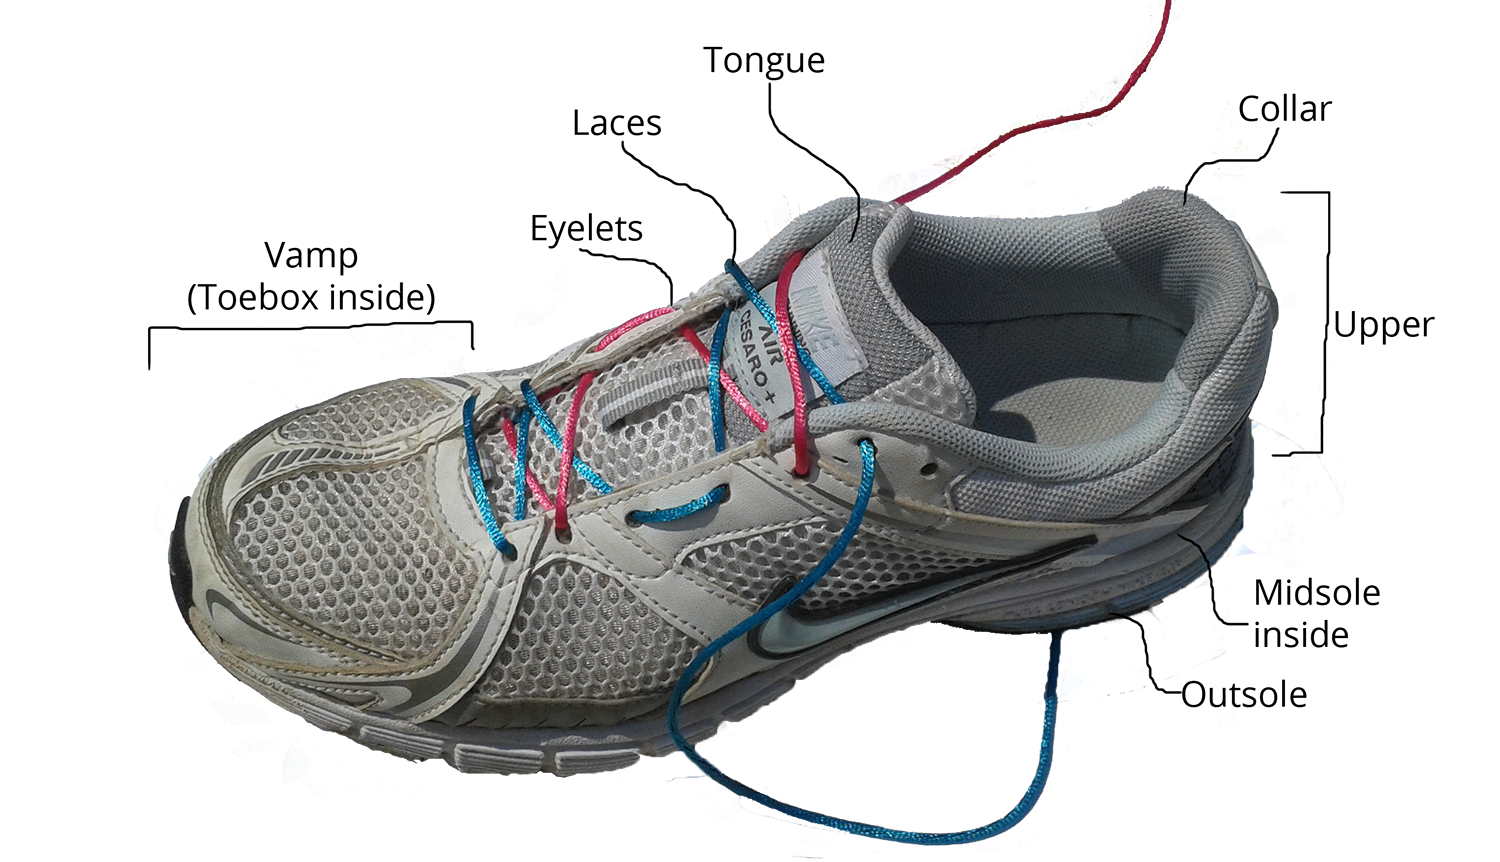
Category Archives: footwear

Types of Footwear

Footwear options for bushwalking

Good shoes take you good places. Unknown

The choice of footwear can make or break a trip. Ultimately the type of footwear a bushwalker selects is a very personal choice, but the most important things to consider are:

(i) are they comfortable; and
(ii) are they suited to the terrain and weather conditions?

For instance, a snowy alpine trek will expose feet to very different conditions to a creek bash in the tropics. New bushwalkers don’t need to start out with expensive bushwalking footwear. It’s much better to begin using a simple pair of sports shoes or similar – basically something very familiar and comfortable – and then do some more reading and research (and talk to people) before buying. Many bushwalkers swear by Vollies and KT 26s, even for tackling fairly difficult terrain such as South West Tasmania. Once familiar with the pros and cons of each footwear type, and how to ensure a good fit, the selection process becomes easier.

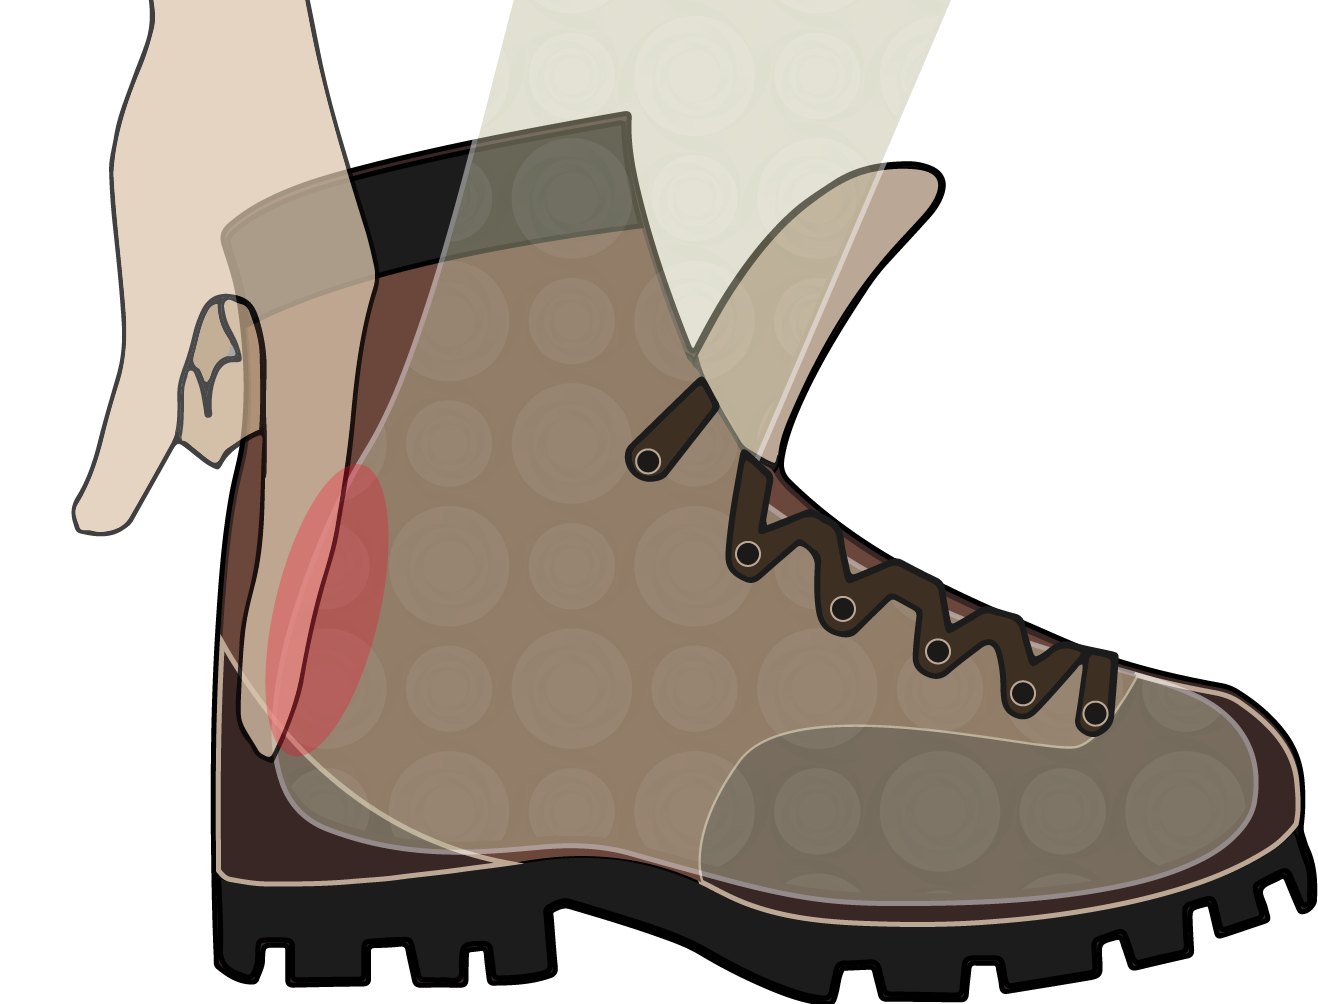
Leather boots Pros and cons of leather boots

Hiking boots are common in Europe and America, where many tracks climb exposed mountain ranges with extreme weather conditions. In Australia, there are fewer tracks that require hiking boots.

A common reason to select ‘high-top’ or high-ankle boots is to provide ankle support, however, there is little to no scientific evidence to support this. In fact, people who wear footwear with a low-cut ankle not only show no difference in ankle injury, but also have footwear that is lighter, more comfortable and less expensive. Heavy boots make it hard to feel the terrain underfoot and judge what’s slippery or uneven, arguably leaving the user more prone to injury than user wearing a lightweight pair of comfortable sports shoes.

Although the ankle support reason for wearing boots appears to be a myth, boots have merits that should be considered.

PROS

  • Rigid sole
    Boots generally have a thick, rigid sole that spreads the pressure on steep or spiky terrain where a lot of weight gets put on a small part of the foot. Because feet are not accustomed to carrying the additional weight of a heavy backpack, a rigid sole also provides foot support.
  • Insulation
    The thicker material and longer ankle parts of boots keep feet warmer in cool climates.
  • Effective at keeping feet dry
    If boots are treated and maintained well, the material is reliably water resistant, providing water doesn’t enter through the top such as during a creek crossing or in rain.
  • Foot protection
    Thick toe and heel material provides protection from sharp rocks, snow and rough terrain.
  • Stops unwanted items entering the boot
    The higher ankles work with gaiters to prevent dirt and rocks from entering.
  • Durable
    If leather boots are well maintained they can last a long time, a lot longer than running shoes.

CONS

  • Weight
    Leather boots are heavy, requiring more energy per step. It’s harder to ‘feel’ the track, making users more likely to misjudge the track conditions, slip or injure themselves.
  • Breathability
    Less breathable than synthetic materials, increasing the chance of blisters.
  • Breaking in
    Leather boots need to be broken in before the leather is a comfortable stiffness. This can mean that the first 4-6 walks in the boots are uncomfortable.
  • Price
    Leather boots are generally at the high end of the price range, and a decent pair can be very expensive, perhaps $250-450. However, ten pairs of $25 runners may last as long as one pair of $250 boots. Price and durability must be considered together.
  • Other
    Boots can take a long time to dry out. Wet leather boots are often heavy and uncomfortable.

SUMMARY
If not used in sharp, rough terrain with extreme weather, the disadvantages of using heavy boots usually outweigh the advantages. For easier conditions, it is suggested that you select something more comfortable.

Synthetic boots Pros and cons of synthetic boots

Synthetic boots have much the same advantages and disadvantages as leather boots but are generally a little lighter and more comfortable.

PROS

CONS

  • Weight
    While lighter than leather boots, synthetic boots are still heavier than most other shoe types. Again, heavier boots require more energy per step. Cumbersome boots also make it harder to ‘feel’ the track, making users more likely to misjudge the track conditions, slip or sustain an injury.
  • Breathability
    Synthetic boots are generally more breathable than leather boots
  • Price
    Generally more affordable than leather boots but still not cheap.
  • Other
    Once wet, large heavy boots can take a long time to dry out.

SUMMARY
Although a little less expensive, more comfortable and affordable than leather boots, synthetic boots are still only needed when heading over particularly steep and sharp terrain and in cold weather conditions. For most NSW walking areas this type of boot is unnecessary.

Low-cut walking boots, running shoes, sand shoes Pros and cons of low-cut walking boots, running shoes, sand shoes

Low-cut walking boots are half-way between a hiking boot and a running shoe. Low-cut walking boots are generally made with the same type of synthetic boots, the sole is thicker and more rigid than a sports shoe, but the ankle is still low. Sand shoes are generally made from lightweight, thin materials, and because of the rubber sole, Dunlop Volleys are very good for creek walking and canyoning. However, new Volleys don’t tend to last as long as they used to.

PROS

  • Usability
    Very comfortable. As the weight and design is similar to shoes used in everyday life, feet are generally accustomed to using this shoe style.
  • Price
    Much more affordable than boots ($50-250), however, may need 10 pairs to last as long as a pair of boots.

CONS

  • Durability
    Sports shoes tend to wear out a lot quicker than boots. For example, ten pairs of runners at $25 each may last as long as one pair of $250 heavy boots).
  • Effective at keeping feet dry
    Not water-resistant, but tend to dry fairly quickly and not get too heavy when wet.
  • Other
    Low-cut ankles allow detritus to build up inside.

Summary
Because they’re comfortable and affordable, sports shoes are great when starting bushwalking. Low-cut walking boots are more durable, suitable for most terrains and conditions. Consider upgrading to something heavier if planning to walk particularly rough terrain or in cold conditions such as alpine walking.

Barefoot style shoes Pros and cons of barefoot style shoes

There is still debate whether minimalist shoes such as the barefoot Vibram five finger running shoes lead to less injury than running with traditional running shoes, and more research needs to be done to determine if there are disadvantages to using minimalist shoes. Research on the biomechanics of foot impact while running suggests that landing on the forefoot has less impact than landing on the heel. This style of running is encouraged by barefoot style shoes, however, traditional running shoes promote heel landing.

While, some bushwalkers like using Vibram five finger running shoes, others find them extremely uncomfortable. If considering using them on a bushwalk, try them out thoroughly around home first before committing to them on a bushwalk.

PROS

  • Weight
    Lightweight: feels almost like being barefoot.
  • Other
    Quick to dry out.

CONS

  • Price
    At $100-150, relatively expensive for what you buy.
  • Durability
    Easily ripped on sharp objects or terrain.
  • Warmth
    Don’t keep feet warm.
  • Other
    Become smelly quickly, and require daily washing to prevent it.

Summary
Barefoot style shoes work extremely well for some people while others hate them. Test them out thoroughly at home before committing to using them on a bushwalk, and consult a professional if unsure about their suitability.

Sandals, thongs Pros and cons of Sandals

Sandals are comfortable to wear around the city and beach, but due to the thin heel, straps and the stabbing of sticks, many people find them uncomfortable over long distances. Sandals may be an alternative to shoes at camp to air feet out or for short creek crossings. Crocs are an Aussie favourite.

PROS

  • Weight
    Lightweight.
  • Price
    Varies from very low cost ($10) to that of a medium quality boot ($40-80).
  • Other
    Quick to dry out.

CONS

  • Protection
    Little protection against very hot or cold conditions. Little protection against rough, spiked or sharp terrain. Little protection from insect bites or scratchy vegetation.
  • Comfort
    Straps can cut into the feet, making walking long distances uncomfortable. Sandal straps tend to rub, and thongs easily slip off the feet.

Summary
Sandals are not ideal for walking, but may be handy in camp to air feet out at the end of the day. Although some people find them comfortable to walk in over long distances, sandals provide less protection than enclosed footwear, and most people would not find them providing enough support or grip in rough terrain.

Barefoot Pros and cons of barefoot

Dot Butler is famous for her barefoot explorations of the bush around Sydney. Walking barefoot brings an amazingly close connection to the track, the terrain and the wildlife where the track goes, but does leave the walker vulnerable to injury (e.g. sticks, sharp rocks. Walking barefoot is generally inadvisable, but is done by some experienced people that know their body and the terrain well.

PROS

  • Weight
    None.
  • Price
    None.

CONS

  • Protection
    No protection against very hot or cold conditions. No protection against rough, spiked or sharp terrain. No protection from insect bites or scratchy vegetation. Toes easily stubbed.
  • Other
    Takes time to wear in feet. People walking barefoot must know their body and the terrain well. People generally find it harder to walk fast and/or carry a heavy backpack barefoot
    Less capacity to deal with emergencies.

Summary
Walking barefoot is a fantastic way of connecting with the natural landscape. However, it’s something that requires a slow build up by training the feet and getting to know the terrain well. For most bushwalkers, a lightweight shoe protects their feet enough to give them the confidence to walk through the bush without worrying about their feet getting injured.

Footwear Attributes

Fabrics and features

Of all the paths you take in life,
make sure a few of them are dirt. John Muir

Finding the right footwear can take a long time, and there’s a lot to consider. But taking the time to understand key features can make it easier to get a good fit. Below are some core features to consider.

Comfort What makes for comfortable bushwalking shoes

In general, shoes are made of an upper, insole, midsole and outsole. Some have an ankle collar, and roll bars or gel pads for extra comfort, while others also have metal eyelets or hooks to assist with lacing.

Here are a few key things to look at to make sure the shoe provides the most stability and cushioning.

  • Comfortable upper
    Made of leather, mesh or synthetic material. Holds foot in place. Mesh allows for breathing and comfort.
  • Achilles notch
    Takes pressure off the Achilles tendon to improve comfort. Includes ankle collar, which wraps around ankle to provide cushioned support the foot directly and aid shock absorption.
  • Comfortable insole
    The insole supports and cushions the arch. Insoles can be replaced with different or new insoles. Useful when trying to dry shoes out after a day of walking or to increase cushioning.

Materials Key materials used in bushwalking shoes, their price and durability

The type of materials used to make a shoe or boot determine the weight of the footwear. The lighter the footwear, the less energy it takes per step. Unfortunately, lightweight materials tend to wear out quickly. So there’s a trade-off between more durable and heavier materials that last longer and lighter materials with a shorter life.

  • Upper fabrics
    The upper part of shoes are typically made from leather, mesh or synthetic material. When well looked after, leather is the most durable, but the heaviest and most expensive. Synthetic materials are also strong, and lighter, but nowhere not as breathable as mesh fabric, which is the lightest, but least durable upper shoe option.
  • Sole
    Most footwear has rubber soles with various types of grip. Sometimes additives such as carbon are used to increase the hardness of the sole, such as in mountaineering boots. In general, the harder and sturdier the sole, the more expensive the boot is, but the longer it will last.
  • Laces
    Modern laces are made from synthetic fibres, such as nylon, textured polyester, spun polyester and polypropylene. These are inexpensive and lightweight, but tend to be more slippery and hence more likely to come undone than traditional materials such as hemp, jute and cotton.

There are four types of fasteners.

  • Punched eyelets
    Holes that are punched directly into the material and reinforced with metal grommets. Effective and inexpensive, but may tend to rip out.
  • Webbing
    As with punched eyelets, also tend to wear out quickly.
  • D-rings
    Durable metal loops that allow laces to be easily done up but can irritate some users due to the increased pressure on the foot at these locations.
  • Hooks
    Open metal hooks, often in the top 3 or 4 fastener locations. Effective for tightening boots and rare in other shoe types.

Waterproof-ness How waterproof can hiking boots really be?

Waterproof boots are only waterproof until the walker steps in a creek, river, or puddle higher than the height of the boot. In these cases the boot fills with water, becoming heavy and uncomfortable. Hence, the boot may need emptying before continuing.

Except gum boots, most footwear is not waterproof. Precipitation and water on the ground will eventually lead to water inside the footwear.

Footwear that allows water to easily enter and leave is advantageous when crossing rivers. However, in cold and wet environments such as alpine regions, such footwear fails to keep feet warm. In these conditions, more substantial boots are preferable to running shoes.

Leather is naturally water-resistant. If kept in good condition and treated well to avoid cracks and drying out, leather can be effective for a long time. A wax maximises waterproofness. Treatments for Nubuck and suede are available, although different re-proofing products must be used. Fabric boots can be made more water-resistant by regularly applying the correct product, although due to mud and dirt getting into the material they tend to degrade faster than leather boots.
Heavier leather or fabric boots last longer than non-waterproof sandshoes, Volleys or Vibram shoes. These are ideal for creek walks where it’s likely the track will weave back and forth across the river, and it’s impossible to keep feet completely dry.

Ankle and arch support Do some shoes promote ankle and arch support better than others?

Ankle Support

Compared to high-ankle footwear users, low-ankle footwear users not only have no difference in ankle injury, but also are generally able to select footwear that’s lighter, more comfortable and less expensive. Evidence suggests that comfort is the key and doing ankle strengthening/stretching exercises are a more sustainable way of ensuring fewer ankle injuries rather than high-ankle support shoes alone.

Ankle Protection

Another argument that people give for high-ankle footwear is that they provide extra protection against snake bites. However, snakes are capable of attacking much higher than ankle height, and snake handlers don’t rely on their boots only. Instead, they use snake gaiters that are specially tested to be effective against snake bite, something that most shoe companies would not test. That said, footwear that’s higher at the ankles provides a good overlap for gaiters and another layer that snake needs to penetrate. Bushwalking gaiters are not snake-proof. Instead, they are snake-resistant, and not even that for bigger more aggressive species. Heavier fabric and knee-length will give the most protection. While it’s rare to be bitten by a snake, always be careful and give snakes room to escape.

Proprioception

Proprioception is the unconscious perception of movement and location of ankle joints. Accurate proprioception can be lost after sprain injuries. Taping or bracing the joint has been suggested as a mechanism to enable a walker to detect movement through other feedback nerves further up the leg. More than 30 studies have tested this, and an overall synthesis of this literature suggests that ankle taping or bracing does not alter proprioception[note]Raymond, Jacqueline, et al. “The effect of ankle taping or bracing on proprioception in functional ankle instability: a systematic review and meta-analysis.” Journal of Science and Medicine in Sport 15.5 (2012): 386-392.[/note]. There is, however, some evidence to suggest that ankle taping or bracing reduces the risk of re-spraining the ankle[note]Verhagen, Evert ALM, Willem van Mechelen, and Wieke de Vente. “The effect of preventive measures on the incidence of ankle sprains.” Clinical Journal of Sport Medicine 10.4 (2000): 291-296[/note], but Raymond, Jacqueline, et al. 2012 suggest that this is from restricting joint motion and mechanical instability, and improving confidence during physical activities. Thus, there is currently no clear scientific evidence to support the need for high ankle support in people without previous sprain injuries.

Arch support

The alignment of foot muscles, tendons, bones and ligaments form lengthwise and side-to-side arches. These arches help distribute body weight evenly across the feet when walking across uneven surfaces. Some feet require more arch support than others, based on the shape of the foot and how well it can support the weight of the body.

It’s possible to identify high and low arches using a simple test. Dip your feet in water and rest them on cardboard. If the whole foot is visible, then the foot is low arched. If only the front and back are visible, the foot is high arched.

Here’s what footwear to look for depending on arch type:

  • High-arches
    Feet may not absorb shock well. Select extra cushioning to compensate for lower natural shock absorption.
  • Neutral-arches
    Feet are neither overly or underly arched. Select firm midsoles.
  • Low-arches
    Commonly referred to as ‘flat feet’. Feet may have additional joint or muscle stress. Select footwear that best stabilises the foot.

People use foot orthotics (also known as ortheses) to correct and support the foot, and have their footwear fitted with the correct insoles. If this is a concern, see a professional before selecting footwear and insoles.

Grip What makes some types of footwear grip better than others

Footwear grip depends on the tread and materials. Rubber is used on most walking footwear as it gives good grip and is easy to mould. Some specialist footwear such as mountaineering boots has additives like carbon to increase the hardness of the sole.

Lugs are the traction-giving bumps on the sole of the footwear, and how they are arranged can change the effectiveness of the grip. Deeper thick lugs improve grip, and wider spaced lugs shed mud easily and gives good traction. Good heel grip is necessary to reduce the chance of sliding on steep sections. Open grooves at the edge of the sole allow for self-cleaning grooves that work out mud and dirt while walking.

Crampons are metal spikes attached to boots giving grip on ice. They’re most commonly used by ice climbers, but also by walkers crossing snowfields or glaciers. Ice climbing crampons are rigid and big, usually 12 spikes. Crampons used for less serious conditions are often smaller, usually four spikes, and can sustain some flexing. Snowshoes are an alternative footwear for crossing snow and work by distributing the weight of the user across a larger area and hence prevent the person from sinking into the snow.

Ethics The ethics behind footwear production

It’s easy to consider bushwalking as a low-impact pastime, especially when following Leave No Trace principles, but in an increasingly global economy, it’s common for bushwalking gear to be produced in other countries. Often gear travels half-way around the world before it is sold. Hence, the environmental and social impacts of where and how gear is produced must be included when calculating the true implications of a pastime such as bushwalking.

In the last 20 years, more and more major footwear companies have been accused of exploiting workers in third world countries. Some companies exploit workers in developing countries with unfair pay and working conditions. Companies have also been accused of using materials that are damaging to human health and the environment.

The Ethical Company Organisation evaluated the performance of top players in footwear production on human rights, environmental and animal rights. They found that Po-Zu, Cheatah and Birkenstock performed the best, whereas Reebok, Shelleys, Umbro were the least ethical shoe making companies.

Although campaigning has forced major companies to re-evaluate working conditions, there is still much room for improvement. Take a moment to consider a company’s ethics before buying footwear, or indeed any other product, from them.

Fitting

Making sure your walking boots or shoes fit well

Shoes transform your body language and attitude. They lift you physically and emotionally. Unknown

It’s important to take the time to find the right footwear. Everyone’s feet are quite different, and different brands have slightly different sizing, so trying on a variety of brands and sizes will more likely help to get a good match. Keep in mind that the most suitable footwear might not be an expensive high-end shoe or boot: expensive shoes that are badly fit can make for a miserable bushwalking experience. Be open to trying a variety of footwear types and sizes, and take the time to trial them thoroughly.

General tips:

  • First and foremost, the footwear must be a good fit and feel comfortable. Any discomfort (pinching, rubbing, tightness) will only get worse on a bushwalk.
  • Aim to fit new footwear in the evening, since feet tend to swell during the day. Also, check the fitting again first thing in the morning. In both cases, the footwear should be comfortable.
  • Wear the socks that you’re planning to walk in when trying on the footwear.
  • Trim toenails beforehand.
  • Take any orthotic footbed needed.
  • Properly fitting footwear will lock the heel in place, be a snug fit around the foot but still allow enough room to wiggle toes. Toes should not hit the toebox.
  • Buying footwear online is hard, unless buying a pair that has previously worked well. If trying a new style or brand, take the time to visit a local outdoor shop.
  • Leather boots need breaking in, particularly near the front of the boot, the sides and the heel. Keep this in mind when fitting leather.

Fitting A step by step guide to fitting bushwalking footwear

  1. Select an appropriate footwear style based on the type of walking and areas they’ll most likely be used on.
  2. Try a variety of sizes and brands of that footwear. If possible, get feet measured in a by a standard shoe-fitting device (even if size is known). It’s common for people to have one foot larger than the other. Always size footwear to the biggest foot.
  3. Loosen laces, slip foot inside.
  4. Before doing up the laces, check the length: when the heel is fully down, there should be roughly one finger width between the heel and shoe. Also, check toe-splay when standing up: there should be no rubbing or discomfort.
  5. Lace up footwear, making sure the ankle is securely locked in.
  6. Now check the width: the toes and sides of the feet should not be squashed nor slide from side to side.
  7. Walk around and roll forward onto tip toes several times: the heel should not lift or rub. Check by crouching down and bending forward. If the heel is rubbing, select footwear with a smaller heel.
  8. how-to-fit-hiking-boots-4_1500

  9. Walk up and down an incline: toes should not press against the toebox.
  10. how-to-fit-hiking-boots-3_1500

  11. Check there’s no pinching at any points (e.g. from the laces or tongue).
  12. If everything checks out okay, do a few more laps around the store to be sure. Don’t rush, take the time to figure out what’s comfortable and right. Before purchasing, check the returns policy: many shops are happy to accept footwear returns as long as they haven’t been worn outside.

Custom footwear fitting Tricks for fitting boots and shoes to some foot oddities

Everyone’s feet are slightly differently shaped, and it can be challenging finding footwear to work for some types of feet. There are a few tricks that can help improve fits for some common foot types.

  • Narrow foot
    Use a thicker insole or try a different lacing technique.
  • Narrow heel
    Try a woman’s footwear as they tend to have a slightly narrower heel.
  • Wide foot
    Try a men’s footwear as they tend to be wider. Alternatively, change the lacing technique to remove pressure on the front of the footwear.
  • High instep
    Put in additional arch support on the insole.

Comfort How to make existing footwear more comfortable

There are a few basic repairs and adjustments that can help give an old pair of boots or shoes a new lease of life. As long as the soles are not too worn, and the upper material is still in good condition, it’s worth tweaking a few things to make them last a few more miles.

  1. Replace the laces, which stretch and wear out over time. New laces have better grip and are able to hold the foot more strongly in place.
  2. Replace the insole, which wears thin and degrades over time. A new thicker insole improves support by providing a tighter fit. Using an extra insole is also another way to combat heel-slip by locking the foot tightly in place.
  3. Replace socks, which wear out over time. New socks make all the difference for comfort and support.

Lacing

Best ways to lace footwear

You know you’re getting old
when you stoop to tie your shoelaces and
wonder what else you could be doing down there. George Burns

Laces help to lock the foot in place stopping it from moving around and rubbing. There are many different ways to lace footwear using different knots and threading techniques, and in doing so, it’s possible to lace footwear to benefit people with narrow heels or high insteps. The idea is to apply more pressure to certain parts of the foot while relieving pressure on other parts, and this helps to secure the foot into the footwear. Lacing should be done up tight (but not overtight) and should have even tension across the boot or shoe.

Types of knots Suitable knots for bushwalking shoes

Laces are typically tied with a knot at the top of the boot or shoe, but this isn’t the only place where tying a knot is handy. Knots can also be useful part way up the boot or shoe to lock off certain areas from others, such as the lower half from the upper half.

Knots at the top of the boot or shoe
The Bow Knot
A Bow knot is the typical knot done at the top of the boot or shoe.

Knots elsewhere on the boot or shoe
The Overhand knot
This is the overhand loop that starts a bow at the top of a boot or shoe, but can also be used at other points too as a way to lock off and reduce tension below the knot.

The Surgeon’s knot
The same as the overhand loop only instead of going around just once and pulling taut, go around 2-3 times. This is a helpful way of having different tension between the upper and lower part of the boot or shoe, so it’s possible to have loose and tight sections. For instance, if there’s a sore spot at the top of the foot, make the lacing below it tight, lock off with a surgeon’s knot, the tie laces loosely above.

Fasteners
Fasteners are metal reinforced holes that make walking shoes or boots easier to lace up. There are four main types of fasteners.

  • Punched eyelets
    Holes that are punched directly into the material, reinforced with metal grommets. Effective and inexpensive, but may tend to rip out.
  • Webbing:
    As with punched eyelets, also tend to wear out quickly.
  • D-rings
    Durable metal loops that allow laces to be easily done up but can irritate some users due to the increased pressure on the foot at these locations.
  • Hooks
    Open metal hooks, often in the top 3 or 4 fastener locations. Effective for tightening boots and rare in other shoe types. If the laces are slipping, create a loop on the hook by lacing down instead of up.

Types of lacing What kind of lacing helps different foot difficulties

Most laced footwear has criss-cross lacing.

criss-cross lacing

There are an enormous number of other ways to lace shoes, including the means to deliver secret messages.

Lacing may make a huge difference when footwear doesn’t quite fit. Here are some common issues and lacing solutions.

Laces snagged on passing scrub
Try an inside-out version of straight bar lacing which keeps the knots and lace ends to one side and distributes pressure evenly. When laced so that both knots face inwards (between ankles), laces are less likely to get snagged in scrub.

inside out version of straight bar lacing
Laces snagged on passing scrub_1500

Another variation is to cross the laces (like criss-cross lacing) but go down an eyelet on one side and up the eyelet on the other. This keeps the laces away from each other and gives a more uniform pull, allowing the two sides to meet if so needed.

Pressure points
Try gap lacing. Creating a gap in the middle of the lacing is an effective way of bypassing pressure areas by not having direct pressure from the lace or a lace crossover point.

gap lacing
Pressure points_1500

This is a good way of removing pressure from the top of the foot, particularly if the shoe or boot is digging in. This can happen to people with a high instep. Reduce pressure by applying a gap lacing over the sensitive area, and consider using a surgeon’s knot to lock the laces on either side.

Alternatively, try straight bar (parallel) lacing to reduce pressure on top of the foot.

straight bar (parallel) lacing
straight bar_1500

Heel blisters
Try heel-lock lacing. Blisters form when skin is rubbed continually at one spot, which can happen if the boot or shoe is loose at the heel. The heel lifts up with every step, causing friction, eventually leading to a blister. The heel-lock lacing technique allows the heel to be firmly positioned.

  • For low-cut shoes, create extra loops using of the top eyelets and lace through these to tighten the heel in place.

heel-lock lacing
For low-cut shoes_1500

  • For high-ankle boots, use a surgeon’s knot directly opposite the heel to lock the heel in place. Then tie off higher up the boot using the metal eyelets. Note, there are many different ways to tie off. Here’s one example that uses the same locking mechanism as low-cut shoes above.

for high-ankle boots_1500

Narrow feet
Lock off footwear at multiple points. Footwear can be made to fit narrow feet better by isolating different parts of the laces with a Surgeon’s knot.

high-ankle boots_1500

Ankle Pressure
Finish off laces differently. Take pressure off the top of the boot by bringing the laces over the top of the hooks first, then tie the laces.

ankle pressure_1500

Maintenance and Repairs

How to look after your footwear

Shoe repairs:
I will heel you;
I will save your sole;
I will even dye for you. Unknown; Shoe repair shop

Regular maintenance of bushwalking footwear keeps them in good condition for longer, allowing them to be used on more trips. Unfortunately, like most bushwalking gear, boots or shoes are also subject to a fair bit of wear and tear out on a bushwalk from weather conditions, terrain and vegetation. Walkers that take good care of their footwear with some basic maintenance checks and repairs before, during and after the walk, can use them more reliably and for longer.

Before the walk
Here are some general maintenance footwear checks to do before heading into the bush.

  • Overall Condition
    Check for cracks or rips; loose soles or insoles; stitching.
  • Laces
    Replace any frayed or worn laces.
  • Eyelets/D-rings
    Check if loose or cracked.
  • Breaking boots in
    Leather shoes need considerable time for the leather to mould to the foot.
  • Waterproofing
    If needed, use the appropriate product to waterproof the boot or shoe fabric. For synthetic materials, it’s usually a silicone-based product, and for leather it’s oil-based.

During the walk

  • Remove any debris or dirt picked up along the way (both exterior and internal).
  • Make any short-term field repairs as necessary such as replacing broken laces.
  • On multi-day trips, dry footwear out overnight. Be wary of drying out footwear close to a campfire or heater: footwear materials easily melt with direct heat and leather boots also crack in direct sunlight. Also, be wary of leaving boots outside in cold conditions as they can freeze and crack. The following morning, shake out boots before putting them on in case anything has crawled in overnight.

Back home:

  • Give footwear an initial clean using a brush to remove dirt, then add running water and mild soap (check manufacturer’s recommendations). Clean the inside of the boot to remove mud and sweat.
  • Thoroughly dry out footwear, but not in direct heat or sunlight.
  • Re-waterproof boots if necessary. Leather boots need to have a leather conditioner regularly applied to stop the boots drying out.
  • Perform a general maintenance and make any repairs in time for the next bushwalking trip.
  • Store in a cool, dry place. Avoid humid areas. Also, don’t put them in a plastic bag as this prevents footwear from airing. Take the boots off before storing them.

Biosecurity How to walk without spreading harmful biological materials

Pathogens are anything that causes a disease, and can have devastating effects on native wildlife. Infected populations often suffer excessive losses due to lack of immunity, and are swamped by other species, both exotic and native. In extreme cases, disease can lead to the local extinction of a species.

Pathogens can disperse by a few methods including water and wind, but also by using a carrier, that is, by attaching seeds or spores to living creatures. Hitching a free ride can be a highly effective way of dispersing, and invasive species spreading this way can have dramatic consequences for the local ecosystem and ecology. Once a weed is established, it is extremely challenging to remove it: better to stop weeds entering native areas in the first place. Phytophthora, a soil-borne water mould, has had devastating effects on plant communities in the Sydney region. Spread via water, soil and human activity, it has effectively dispersed into many native vegetation patches around Sydney, and local management authorities and community groups are working hard to combat the spread.

Bushwalkers are perfect carriers not only for pathogen spread but invasive weeds too because they often go between urban and predominantly native areas, and generally travel considerable distances. National park trail heads quite often have cleaning stations where visitors are asked to clean their boots to ensure they don’t bring anything into the park. Being particularly good at spreading weeds and pathogens, it’s vital that bushwalkers do as much as possible to prevent it.

Set good examples to the group and other bushwalkers. Here are some tips to prevent the spread of pathogens and seeds.

  1. Check park guidelines: some areas have specific problems and management strategies that all park visitors must follow.
  2. Make sure that clothes and footwear are clean of all organic matter including mud, seeds, spores and burrs before heading into the bush. Check upon return too.
  3. Never discard fruit and vegetable in the bush: they can germinate into non-native plants. Also, take care when eating not to drop any material or leave food behind at lunch and rest stops.
  4. If walking through farmland or areas with lots of weedy species, avoid wearing materials on the lower half that make it easy for seeds and spores to stick to. Cobbler’s pegs (Bidens pilosa) is a nightmare weed in Australia, with numerous peg-like seeds sticking easily to woolly socks and thermal materials.
  5. If seeds are caught on gear or clothing, remove seeds, place in a plastic bag and carry them out.
  6. It’s helpful to know some basic botany: get to know some common weed species. Join a local bushcare community group or community action day to look after local areas.

Gaiters

content

When to use gaiters

quote

The mountains are calling and I must go

content

Gaiters provide boot and leg protection against vegetation, pebbles, dirt, mud and snow. They’re helpful in muddy conditions, on tracks with abrasive or stinging scrub, and on off-track walks. In a recent survey about two-thirds of respondents advised that they wore knee-length heavier gaiters most if not all the time while bushwalking.

Materials and Design
Gaiters typically comprise of water resistant uppers that are held in place with Velcro, lace hooks and straps that run underneath the boot.

image

The level of protection depends on the type of material that the gaiters are made from, and how tall they are. Ankle gaiters only cover the ankle region providing minimal protection and are best for walks with only small amounts of debris, mud and water. Knee-length gaiters cover the whole length of the leg below the knee, giving superior protection.

Typical waterproof materials include:

  • Coated nylon
    Most common material used. Lightweight, but less durable than other materials below.
  • Gore-Tex®
    Excellent waterproof and windproof material that also is breathable.
  • Cordura® nylon
    Strong fabric designed to withstand abrasion by rocks and ice.
  • Schoeller® fabrics
    Waterproof, stretchy and flexible.

Select gaiters that give a snug fit, provide the best possible seal and best suits the expected terrain and weather conditions.

Gaiter use
Bushwalkers tend to use gaiters more as they go on more trips. Gaiters are generally not needed on easy to moderate walks. On harder walks, in wetter and muddier conditions and particularly off-track walks, gaiters are very desirable.

The advantages of gaiters are:

  • Footwear, socks, trouser and leg are protected from scrub, sticks, dirt, pebbles, mud and other debris.
  • Prevents debris getting into footwear.
  • Easy to clean and remove biological material.
  • Provides some resistance to snake bites (see below), leeches and ticks.
  • Can be used in tent vestibules to cover dirt or mud.

Some disadvantages of gaiters include:

  • Some gaiters are not very breathable; sweat accumulates.
  • Can hide leeches and ticks. User must be careful to check underneath gaiters for hitch-hikers at breaks.
  • More time needed to change footwear for river crossings.
  • More time needed to get ready in the morning or after lunch breaks if gaiters are taken off, which is a good idea because sweat accumulates.

Bushwalking gaiters do not protect against snake bites. While thicker knee-length gaiters afford better protection than any other option, they do not guarantee non-penetration by a snake, and snake bites should still be treated even if there is no visible wound. Also, given the tendency for gaiters to collect mud, seeds and spores, users must take biosecurity issues seriously and properly clean gaiters after every trip.