Eva

Fitting

Making sure your walking boots or shoes fit well

Shoes transform your body language and attitude. They lift you physically and emotionally. Unknown

It’s important to take the time to find the right footwear. Everyone’s feet are quite different, and different brands have slightly different sizing, so trying on a variety of brands and sizes will more likely help to get a good match. Keep in mind that the most suitable footwear might not be an expensive high-end shoe or boot: expensive shoes that are badly fit can make for a miserable bushwalking experience. Be open to trying a variety of footwear types and sizes, and take the time to trial them thoroughly.

General tips:

  • First and foremost, the footwear must be a good fit and feel comfortable. Any discomfort (pinching, rubbing, tightness) will only get worse on a bushwalk.
  • Aim to fit new footwear in the evening, since feet tend to swell during the day. Also, check the fitting again first thing in the morning. In both cases, the footwear should be comfortable.
  • Wear the socks that you’re planning to walk in when trying on the footwear.
  • Trim toenails beforehand.
  • Take any orthotic footbed needed.
  • Properly fitting footwear will lock the heel in place, be a snug fit around the foot but still allow enough room to wiggle toes. Toes should not hit the toebox.
  • Buying footwear online is hard, unless buying a pair that has previously worked well. If trying a new style or brand, take the time to visit a local outdoor shop.
  • Leather boots need breaking in, particularly near the front of the boot, the sides and the heel. Keep this in mind when fitting leather.

Fitting A step by step guide to fitting bushwalking footwear

  1. Select an appropriate footwear style based on the type of walking and areas they’ll most likely be used on.
  2. Try a variety of sizes and brands of that footwear. If possible, get feet measured in a by a standard shoe-fitting device (even if size is known). It’s common for people to have one foot larger than the other. Always size footwear to the biggest foot.
  3. Loosen laces, slip foot inside.
  4. Before doing up the laces, check the length: when the heel is fully down, there should be roughly one finger width between the heel and shoe. Also, check toe-splay when standing up: there should be no rubbing or discomfort.
  5. Lace up footwear, making sure the ankle is securely locked in.
  6. Now check the width: the toes and sides of the feet should not be squashed nor slide from side to side.
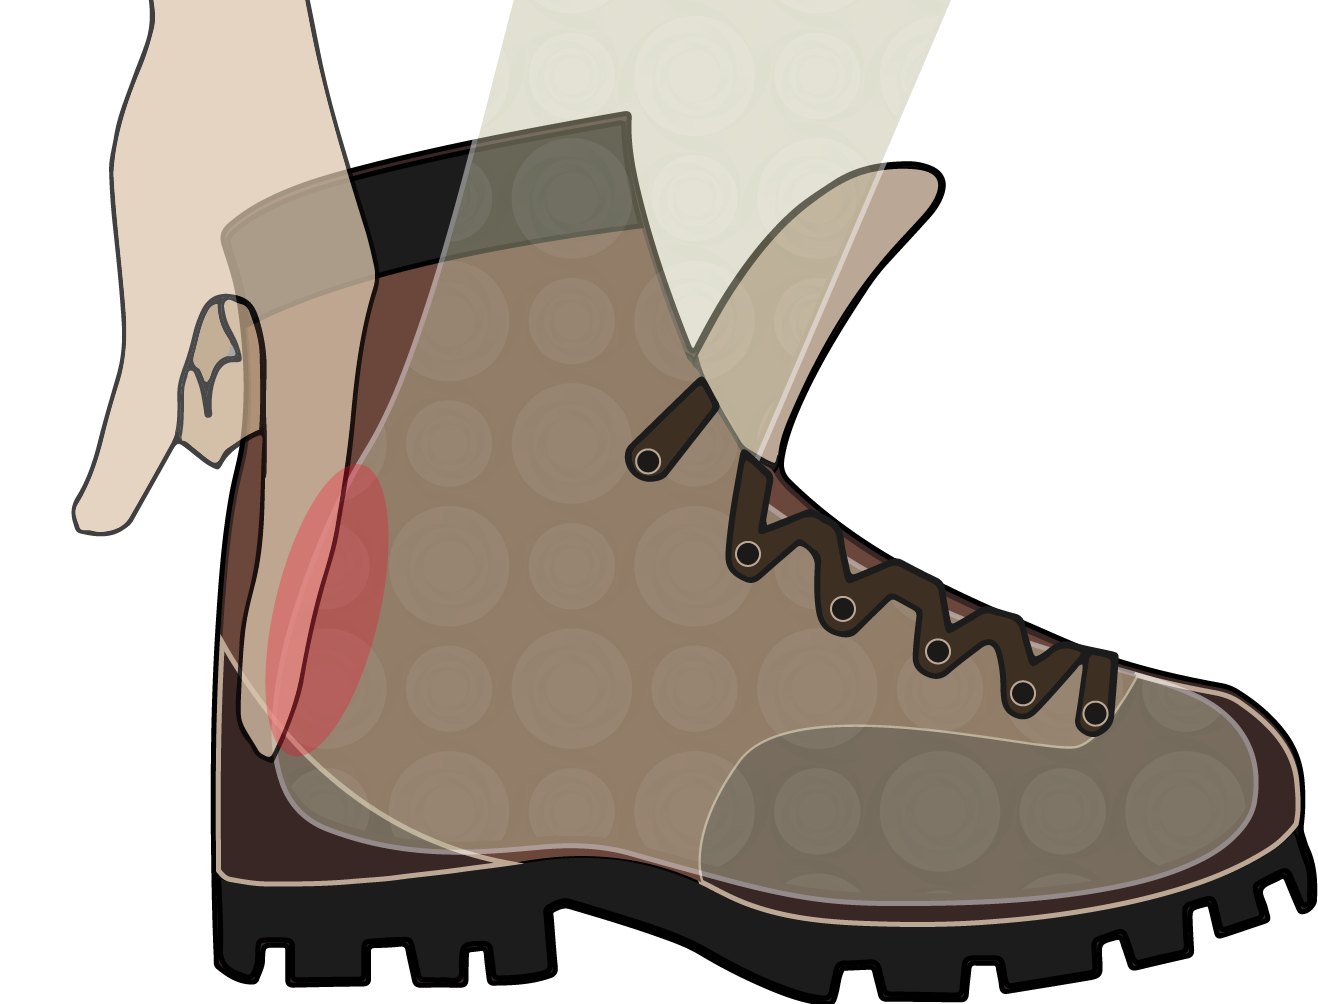
  7. Walk around and roll forward onto tip toes several times: the heel should not lift or rub. Check by crouching down and bending forward. If the heel is rubbing, select footwear with a smaller heel.
  8. how-to-fit-hiking-boots-4_1500

  9. Walk up and down an incline: toes should not press against the toebox.
  10. how-to-fit-hiking-boots-3_1500

  11. Check there’s no pinching at any points (e.g. from the laces or tongue).
  12. If everything checks out okay, do a few more laps around the store to be sure. Don’t rush, take the time to figure out what’s comfortable and right. Before purchasing, check the returns policy: many shops are happy to accept footwear returns as long as they haven’t been worn outside.

Custom footwear fitting Tricks for fitting boots and shoes to some foot oddities

Everyone’s feet are slightly differently shaped, and it can be challenging finding footwear to work for some types of feet. There are a few tricks that can help improve fits for some common foot types.

  • Narrow foot
    Use a thicker insole or try a different lacing technique.
  • Narrow heel
    Try a woman’s footwear as they tend to have a slightly narrower heel.
  • Wide foot
    Try a men’s footwear as they tend to be wider. Alternatively, change the lacing technique to remove pressure on the front of the footwear.
  • High instep
    Put in additional arch support on the insole.

Comfort How to make existing footwear more comfortable

There are a few basic repairs and adjustments that can help give an old pair of boots or shoes a new lease of life. As long as the soles are not too worn, and the upper material is still in good condition, it’s worth tweaking a few things to make them last a few more miles.

  1. Replace the laces, which stretch and wear out over time. New laces have better grip and are able to hold the foot more strongly in place.
  2. Replace the insole, which wears thin and degrades over time. A new thicker insole improves support by providing a tighter fit. Using an extra insole is also another way to combat heel-slip by locking the foot tightly in place.
  3. Replace socks, which wear out over time. New socks make all the difference for comfort and support.

Lacing

Best ways to lace footwear

You know you’re getting old
when you stoop to tie your shoelaces and
wonder what else you could be doing down there. George Burns

Laces help to lock the foot in place stopping it from moving around and rubbing. There are many different ways to lace footwear using different knots and threading techniques, and in doing so, it’s possible to lace footwear to benefit people with narrow heels or high insteps. The idea is to apply more pressure to certain parts of the foot while relieving pressure on other parts, and this helps to secure the foot into the footwear. Lacing should be done up tight (but not overtight) and should have even tension across the boot or shoe.

Types of knots Suitable knots for bushwalking shoes

Laces are typically tied with a knot at the top of the boot or shoe, but this isn’t the only place where tying a knot is handy. Knots can also be useful part way up the boot or shoe to lock off certain areas from others, such as the lower half from the upper half.

Knots at the top of the boot or shoe
The Bow Knot
A Bow knot is the typical knot done at the top of the boot or shoe.

Knots elsewhere on the boot or shoe
The Overhand knot
This is the overhand loop that starts a bow at the top of a boot or shoe, but can also be used at other points too as a way to lock off and reduce tension below the knot.

The Surgeon’s knot
The same as the overhand loop only instead of going around just once and pulling taut, go around 2-3 times. This is a helpful way of having different tension between the upper and lower part of the boot or shoe, so it’s possible to have loose and tight sections. For instance, if there’s a sore spot at the top of the foot, make the lacing below it tight, lock off with a surgeon’s knot, the tie laces loosely above.

Fasteners
Fasteners are metal reinforced holes that make walking shoes or boots easier to lace up. There are four main types of fasteners.

  • Punched eyelets
    Holes that are punched directly into the material, reinforced with metal grommets. Effective and inexpensive, but may tend to rip out.
  • Webbing:
    As with punched eyelets, also tend to wear out quickly.
  • D-rings
    Durable metal loops that allow laces to be easily done up but can irritate some users due to the increased pressure on the foot at these locations.
  • Hooks
    Open metal hooks, often in the top 3 or 4 fastener locations. Effective for tightening boots and rare in other shoe types. If the laces are slipping, create a loop on the hook by lacing down instead of up.

Types of lacing What kind of lacing helps different foot difficulties

Most laced footwear has criss-cross lacing.

criss-cross lacing

There are an enormous number of other ways to lace shoes, including the means to deliver secret messages.

Lacing may make a huge difference when footwear doesn’t quite fit. Here are some common issues and lacing solutions.

Laces snagged on passing scrub
Try an inside-out version of straight bar lacing which keeps the knots and lace ends to one side and distributes pressure evenly. When laced so that both knots face inwards (between ankles), laces are less likely to get snagged in scrub.

inside out version of straight bar lacing
Laces snagged on passing scrub_1500

Another variation is to cross the laces (like criss-cross lacing) but go down an eyelet on one side and up the eyelet on the other. This keeps the laces away from each other and gives a more uniform pull, allowing the two sides to meet if so needed.

Pressure points
Try gap lacing. Creating a gap in the middle of the lacing is an effective way of bypassing pressure areas by not having direct pressure from the lace or a lace crossover point.

gap lacing
Pressure points_1500

This is a good way of removing pressure from the top of the foot, particularly if the shoe or boot is digging in. This can happen to people with a high instep. Reduce pressure by applying a gap lacing over the sensitive area, and consider using a surgeon’s knot to lock the laces on either side.

Alternatively, try straight bar (parallel) lacing to reduce pressure on top of the foot.

straight bar (parallel) lacing
straight bar_1500

Heel blisters
Try heel-lock lacing. Blisters form when skin is rubbed continually at one spot, which can happen if the boot or shoe is loose at the heel. The heel lifts up with every step, causing friction, eventually leading to a blister. The heel-lock lacing technique allows the heel to be firmly positioned.

  • For low-cut shoes, create extra loops using of the top eyelets and lace through these to tighten the heel in place.

heel-lock lacing
For low-cut shoes_1500

  • For high-ankle boots, use a surgeon’s knot directly opposite the heel to lock the heel in place. Then tie off higher up the boot using the metal eyelets. Note, there are many different ways to tie off. Here’s one example that uses the same locking mechanism as low-cut shoes above.

for high-ankle boots_1500

Narrow feet
Lock off footwear at multiple points. Footwear can be made to fit narrow feet better by isolating different parts of the laces with a Surgeon’s knot.

high-ankle boots_1500

Ankle Pressure
Finish off laces differently. Take pressure off the top of the boot by bringing the laces over the top of the hooks first, then tie the laces.

ankle pressure_1500

Maintenance and Repairs

How to look after your footwear

Shoe repairs:
I will heel you;
I will save your sole;
I will even dye for you. Unknown; Shoe repair shop

Regular maintenance of bushwalking footwear keeps them in good condition for longer, allowing them to be used on more trips. Unfortunately, like most bushwalking gear, boots or shoes are also subject to a fair bit of wear and tear out on a bushwalk from weather conditions, terrain and vegetation. Walkers that take good care of their footwear with some basic maintenance checks and repairs before, during and after the walk, can use them more reliably and for longer.

Before the walk
Here are some general maintenance footwear checks to do before heading into the bush.

  • Overall Condition
    Check for cracks or rips; loose soles or insoles; stitching.
  • Laces
    Replace any frayed or worn laces.
  • Eyelets/D-rings
    Check if loose or cracked.
  • Breaking boots in
    Leather shoes need considerable time for the leather to mould to the foot.
  • Waterproofing
    If needed, use the appropriate product to waterproof the boot or shoe fabric. For synthetic materials, it’s usually a silicone-based product, and for leather it’s oil-based.

During the walk

  • Remove any debris or dirt picked up along the way (both exterior and internal).
  • Make any short-term field repairs as necessary such as replacing broken laces.
  • On multi-day trips, dry footwear out overnight. Be wary of drying out footwear close to a campfire or heater: footwear materials easily melt with direct heat and leather boots also crack in direct sunlight. Also, be wary of leaving boots outside in cold conditions as they can freeze and crack. The following morning, shake out boots before putting them on in case anything has crawled in overnight.

Back home:

  • Give footwear an initial clean using a brush to remove dirt, then add running water and mild soap (check manufacturer’s recommendations). Clean the inside of the boot to remove mud and sweat.
  • Thoroughly dry out footwear, but not in direct heat or sunlight.
  • Re-waterproof boots if necessary. Leather boots need to have a leather conditioner regularly applied to stop the boots drying out.
  • Perform a general maintenance and make any repairs in time for the next bushwalking trip.
  • Store in a cool, dry place. Avoid humid areas. Also, don’t put them in a plastic bag as this prevents footwear from airing. Take the boots off before storing them.

Biosecurity How to walk without spreading harmful biological materials

Pathogens are anything that causes a disease, and can have devastating effects on native wildlife. Infected populations often suffer excessive losses due to lack of immunity, and are swamped by other species, both exotic and native. In extreme cases, disease can lead to the local extinction of a species.

Pathogens can disperse by a few methods including water and wind, but also by using a carrier, that is, by attaching seeds or spores to living creatures. Hitching a free ride can be a highly effective way of dispersing, and invasive species spreading this way can have dramatic consequences for the local ecosystem and ecology. Once a weed is established, it is extremely challenging to remove it: better to stop weeds entering native areas in the first place. Phytophthora, a soil-borne water mould, has had devastating effects on plant communities in the Sydney region. Spread via water, soil and human activity, it has effectively dispersed into many native vegetation patches around Sydney, and local management authorities and community groups are working hard to combat the spread.

Bushwalkers are perfect carriers not only for pathogen spread but invasive weeds too because they often go between urban and predominantly native areas, and generally travel considerable distances. National park trail heads quite often have cleaning stations where visitors are asked to clean their boots to ensure they don’t bring anything into the park. Being particularly good at spreading weeds and pathogens, it’s vital that bushwalkers do as much as possible to prevent it.

Set good examples to the group and other bushwalkers. Here are some tips to prevent the spread of pathogens and seeds.

  1. Check park guidelines: some areas have specific problems and management strategies that all park visitors must follow.
  2. Make sure that clothes and footwear are clean of all organic matter including mud, seeds, spores and burrs before heading into the bush. Check upon return too.
  3. Never discard fruit and vegetable in the bush: they can germinate into non-native plants. Also, take care when eating not to drop any material or leave food behind at lunch and rest stops.
  4. If walking through farmland or areas with lots of weedy species, avoid wearing materials on the lower half that make it easy for seeds and spores to stick to. Cobbler’s pegs (Bidens pilosa) is a nightmare weed in Australia, with numerous peg-like seeds sticking easily to woolly socks and thermal materials.
  5. If seeds are caught on gear or clothing, remove seeds, place in a plastic bag and carry them out.
  6. It’s helpful to know some basic botany: get to know some common weed species. Join a local bushcare community group or community action day to look after local areas.

Gaiters

content

When to use gaiters

quote

The mountains are calling and I must go

content

Gaiters provide boot and leg protection against vegetation, pebbles, dirt, mud and snow. They’re helpful in muddy conditions, on tracks with abrasive or stinging scrub, and on off-track walks. In a recent survey about two-thirds of respondents advised that they wore knee-length heavier gaiters most if not all the time while bushwalking.

Materials and Design
Gaiters typically comprise of water resistant uppers that are held in place with Velcro, lace hooks and straps that run underneath the boot.

image

The level of protection depends on the type of material that the gaiters are made from, and how tall they are. Ankle gaiters only cover the ankle region providing minimal protection and are best for walks with only small amounts of debris, mud and water. Knee-length gaiters cover the whole length of the leg below the knee, giving superior protection.

Typical waterproof materials include:

  • Coated nylon
    Most common material used. Lightweight, but less durable than other materials below.
  • Gore-Tex®
    Excellent waterproof and windproof material that also is breathable.
  • Cordura® nylon
    Strong fabric designed to withstand abrasion by rocks and ice.
  • Schoeller® fabrics
    Waterproof, stretchy and flexible.

Select gaiters that give a snug fit, provide the best possible seal and best suits the expected terrain and weather conditions.

Gaiter use
Bushwalkers tend to use gaiters more as they go on more trips. Gaiters are generally not needed on easy to moderate walks. On harder walks, in wetter and muddier conditions and particularly off-track walks, gaiters are very desirable.

The advantages of gaiters are:

  • Footwear, socks, trouser and leg are protected from scrub, sticks, dirt, pebbles, mud and other debris.
  • Prevents debris getting into footwear.
  • Easy to clean and remove biological material.
  • Provides some resistance to snake bites (see below), leeches and ticks.
  • Can be used in tent vestibules to cover dirt or mud.

Some disadvantages of gaiters include:

  • Some gaiters are not very breathable; sweat accumulates.
  • Can hide leeches and ticks. User must be careful to check underneath gaiters for hitch-hikers at breaks.
  • More time needed to change footwear for river crossings.
  • More time needed to get ready in the morning or after lunch breaks if gaiters are taken off, which is a good idea because sweat accumulates.

Bushwalking gaiters do not protect against snake bites. While thicker knee-length gaiters afford better protection than any other option, they do not guarantee non-penetration by a snake, and snake bites should still be treated even if there is no visible wound. Also, given the tendency for gaiters to collect mud, seeds and spores, users must take biosecurity issues seriously and properly clean gaiters after every trip.

First Aid Kit Checklist

Why do we need a first aid kit

First aid is a skill that you learn and a first aid kit contains tools to help you administer care. There are some situations where simple items can save people’s lives (think allergy or heart attack), other items buy you a lot more time for help to arrive (think bleeding or snake bite) and even other items that just allow you continue your adventure (think blisters, small cuts or minor burns).

There are a bunch of factors such as terrain, length of the walk, isolation, weather, group size that will impact on the items and number of each item you carry. Possibly the biggest impact will be how you perceive the duty of care you owe to people in your group (and yourself). Duty of care is simply a moral (and potentially legal) obligation to ensure the safety and well-being of others. Yes, it is possible to do the minimalist thing and manage (not very well) a wound with toilet paper and leaves, but when you think through your duty of care you can decide if that is actually what you want before you leave home.

It is helpful to buy a first aid kit with most of the contents and casing that suits you then add and remove items as needed.
I developed this list for club group leaders, so it has been designed to cope with various conditions, as well as larger and diverse groups of people. On longer walks, you are likely to be exposed to a wider range of injuries and may need to manage them longer.

Personal Protection

  • 4 Rubber gloves
  • 1 CPR Face shield
  • 1 Alcohol gel hand wash

Injury and bleeding management

  • 20 Band-aids (various shapes and sizes)
  • 1 Spare gauze pads
  • 3 Sterile non-stick compresses
  • 2 Triangular bandages
  • 2 Elastic roller bandage
  • 1 Moleskin
  • 1 Steristrips
  • 1 hypoallergenic tape
  • 1 Zinc oxide tape

Wound cleaning

  • 5 Burn-aid burn gel
  • 5 Chlorhexidine wipes
  • 10 Ear buds
  • 2 Saline squeeze vials

Hardware

  • 1 Trauma shears
  • 1 Tweezers
  • 3 splinter probes
  • 1 sewing kit
  • 1 Small torch
  • 5 Safety pins

Information

  • First aid booklet
  • Pencil & paper
  • Group contacts and medical details

Medications

  • Panadol
  • Ibuprofen
  • Aspirin
  • Gastrolyte

Emergency Management

  • Whistle
  • Fire lighter
  • Gas Lighter
  • Micropure
  • Space blanket (light weight)
  • Personal Locator Beacon

Personal Medications
There are some first aid items that people in your group may carry themselves. Such as medications for allergies, asthma, heart conditions and much more. Hopefully, along with the medication, they will have an ‘action plan’ that outlines the process of managing the condition if it flares up. Speak with them about it and know where it is in their pack.

But what about…?
Yes, I can already hear people screaming out, “but what about……..”
If you have someone in your group with a specific risk then there may well be more training and equipment for you to carry.
If you see a reasonably foreseeable need then, add it ?

How far do we take this is always going to be a question.
Should we carry oxygen cylinders? A semi-automatic defibrillator? Splints? Stretchers?
Maybe (not usually), consider vulnerability in your group, costs, weight etc. Think about what is expected of you and what most other people would do in a similar situation. Think about stuff going bad and how you would cope without having it.

It is not normal (yet) to carry a defibrillator on a bushwalk when they become as small and cheap as your phones then I suspect they will be added to our backpacks. The first aid kit will always be changing as technology, medicine, communication and transport improve.

How to pack it
It seems that most walkers have a first aid pouch and pack it near the top of their pack. Usually the PLB is separate. This works, but I do things a little different. I have 2 first aid kits as well as a bandage and the PLB separate. Let me explain.

  • PLB needs to be handy, but not the first thing you grab, so it lives in the main section of my pack.
  • I carry a roller bandage in an outside mesh pocket in my pack (in a snap-lock bag). I just find if I need anything from my first aid kit, it is almost always a roller bandage, usually for a minor strain or sprain. I keep it handy for that reason. It is also quick and easy to access in case of a snake bite, or major bleeding.
  • Oh Crap! Bag. My first, first aid kit is for those moments when someone shouts out (or is way too quiet). Maybe a “trauma kit” would be a better name, but I prefer mine. This is a clear vacuum sealed bag (or just suck the air out of a snap lock bag) with triangular bandages, shears, gloves, shock blanket, etc. Basically stuff to help when someone is likely in a lot of pain or at risk of bleeding out quickly. This bag rips open quickly and basically never gets used, but sits at the very top of my pack, not in any extra waterproofing.
  • Oh Yeah! bag. This is all the other items you would find in a first aid kit list. It is the part of the first aid kit that gets the most use. It is for dealing with minor or less urgent issues, before they become big and ugly. For blisters, small cuts etc.

Getting help
Remember that first aid is mostly about buying time before medical aid can be accessed, and avoiding things from getting worse. For most minor issues you can visit a doctor after you finish the walk, if you need to at all. Occasionally someone in your group, or someone you find on the track may need medical aid urgently. In situations such as a heart attack, stick in the eye, significant bleeding, severe allergic reaction, significant burn the faster you get help, the more likely the person will survive as well as have a faster and better recovery.

You do not want to be in this situation wishing you had a way of contacting help and not been able to. Mobile phones are the best tool, when they work. Download the Emergency+ app now, and you can use it to make the call and know your location.
When you are out of mobile range then I always recommend a PLB.

Potential improvisations
There are many things in your pack, on your body and around you in the bush that can be used to help with first aid. It is worth considering what you already have in your pack that can be used. For example;

  • A sleeping mat can be used to keep a person warm and comfortable, it can also be used as a splint or maybe even a stretcher to help move someone a short distance if really needed.
  • I have used a thick space blanket/tarp to splint a broken lower arm effectively.
  • When my son broke his lower arm, he was holding his arm across his tummy, instead of going through the trauma of opening the first aid kit we were able to make him comfortable just by lifting the lower part of his shirt over his arm and hold it for the drive to the hospital, probably more effective than a triangular bandage in this case.

First aid by remote control
Good first aiders take control of a situation, keeping everybody safe and making good stuff happen.
Great first aiders take control, keep things calm and clearly instruct people to help. If the injured person can safely help, then ask them to. They can clean their own wounds, and put on band aids. Asking people to do their own first aid, under good clear instruction, means you may not need to touch them at all, reducing your exposure and their risk of infection. It helps keep people calm and may even reduce their pain. It helps you be more situationally aware of what is going on around you, allowing you to deal with several injured people at the same time. It also helps improve the dignity of the overall experience and helps people learn new skills from you.